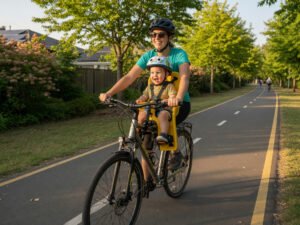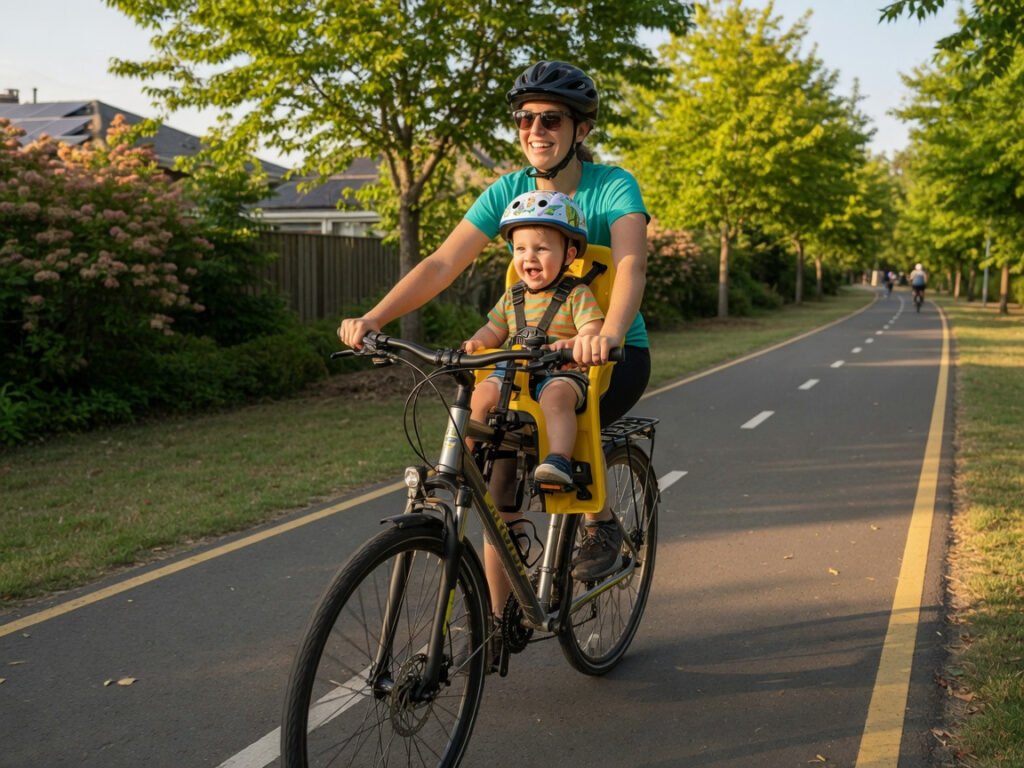

The best front bike seats for toddlers mount between you and the handlebars, carrying your child from around 9–12 months until about age 3–5. Your child faces forward, shares your view, and stays within easy conversation distance — one of the most engaging ways to cycle together as a family.
Quick Summary
- Front bike seats suit children from roughly 9–12 months up to around 3–5 years, or the seat’s maximum weight — usually 15–22 kg
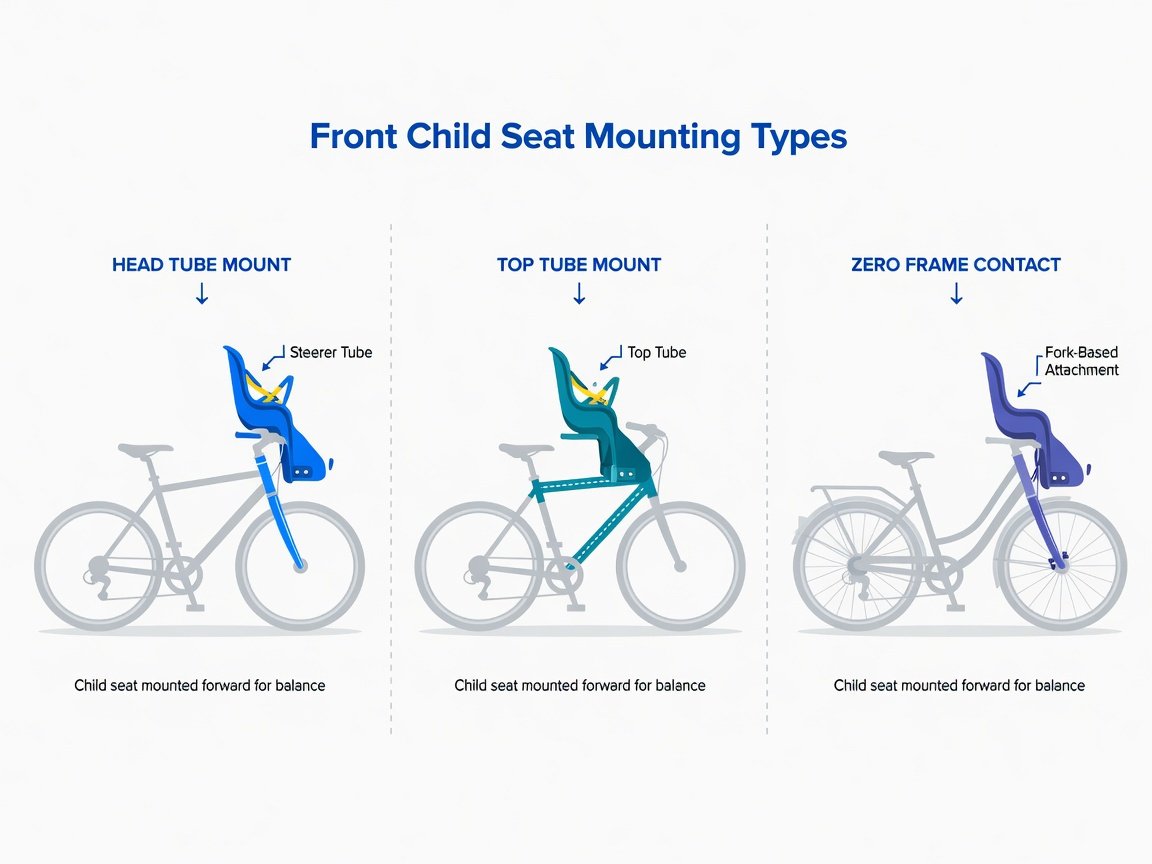
- Three mounting systems exist: head tube, top tube, and zero frame contact — confirming which fits your bike is the single most important step before buying
- Front seats create a close, interactive riding experience ideal for younger toddlers; rear seats and trailers suit older or heavier children better
- Always look for EN 14344 certification, a 5-point harness, and enclosed foot rests before purchasing any child bike seat
What Is a Front Bike Seat — and Why Do So Many Families Choose Them?
A front-mounted bike seat positions your child directly between you and the handlebars, facing forward. This arrangement keeps them fully in your sightline throughout the ride. You can see exactly what they’re doing, chat easily about the things you pass, and share the experience rather than simply towing them along behind you.
Some of the links in this article may be affiliate links. If you make a purchase through these links, we may earn a small commission at no extra cost to you. Thank you.
For many parents, this interactivity is the deciding factor. Rear seats and trailers carry children safely, but front seats keep your child fully involved in the ride. Cycling UK — the UK’s national cycling charity — consistently highlights shared cycling experiences from an early age as one of the most effective ways to build a lasting love of bikes in children. A front seat is one of the simplest ways to create that shared experience long before a child is old enough to pedal independently.
Front seats are also genuinely compact. Most leave enough room on the bike for everyday use and can be left fitted between rides without significantly affecting handling. If you want to understand what a difference regular cycling with young children makes to family life, it’s worth exploring the real joys that family bike rides bring — both for you and your child — before you commit to a seat.
Research from cycling organisations across Europe consistently shows that children who ride regularly alongside parents from an early age are significantly more likely to become confident, lifelong cyclists. A front seat makes that early start possible — even before your child is ready for a lightweight first bike of their own.
How Old Does a Child Need to Be for a Front Bike Seat?
The key milestone isn’t a birthday — it’s head and neck control. Your child needs to hold their head steady while wearing a correctly fitted cycling helmet before they go on any bike seat. Most children reach this stage between 9 and 12 months, though development varies. If you’re unsure, speak to your health visitor before you start.
At the upper end of the range, the seat’s maximum weight limit — not a specific age — signals when it’s time to transition. Most front seats are rated to between 15 kg and 22 kg. Weigh your child at the start of each cycling season and compare the result against your seat’s stated maximum. Never exceed it: weight limits are structural safety ratings, not suggestions.
The physical fit tells you as much as the scales do. If your child’s knees are cramped against your arms, their feet dangle short of the foot rests, or the harness no longer adjusts snugly across their shoulders, the seat has been outgrown regardless of what the scales say. Most children transition naturally between ages three and five.
One point that cannot be overstated: your child must wear a correctly fitted cycling helmet on every single ride — including the very first. Replace any helmet that has taken a significant impact, even if it looks undamaged from the outside. The protective foam may have compressed without showing visible cracks.
What Are the Three Types of Front Bike Seat Mounting?
Getting the mounting type right is the most important single step in buying a front bike seat. There are three systems, each suited to a different range of bikes. Buying the wrong mounting type for your frame means the seat won’t fit — full stop. Here’s exactly what each one involves.
1. Head Tube Mount
A head tube-mounted seat clamps to the steerer tube directly beneath the stem, at the front of the bike. The seat sits over the front wheel, raising the child slightly higher and giving them an excellent forward view. These seats are very stable and work well on road bikes, hybrids, and many mountain bikes. The two key compatibility checks are steerer tube diameter and clearance between the seat and the handlebars. They are typically not compatible with oversized-diameter steerer tubes or carbon fibre steerers unless the manufacturer specifically states otherwise.
2. Top Tube Mount
Top tube-mounted seats clamp to the horizontal top tube of a diamond-frame bike, positioning the child slightly lower with their legs straddling the tube. This is the most widely compatible mounting system for standard adult bikes and tends to be the most straightforward to fit. Check that the clamp range matches your top tube’s measured diameter, and verify there’s sufficient clearance between the back of the seat and the front of your handlebars. Many cycling families choose this system for its broad compatibility with everyday commuter and leisure bikes.
3. Zero Frame Contact
Zero frame contact seats attach via the fork, seat post, or an alternative mounting point rather than clamping directly to the frame tubes. This is the go-to option for step-through, low-step, and mixte-frame bikes that lack a conventional top tube. As step-through frames grow in popularity — particularly across the booming e-bike category — more seat manufacturers are introducing zero frame contact options. The range of seats using this system is still narrower than the other two types, but availability is growing steadily through 2026.
| Mounting Type | Best For | Key Compatibility Check | Watch Out For |
|---|---|---|---|
| Head tube | Road bikes, hybrids, MTBs | Steerer tube diameter; stem and handlebar clearance | Not for oversized or carbon steerers without specific manufacturer guidance |
| Top tube | Standard diamond-frame bikes | Top tube diameter; handlebar-to-seat clearance | Not suitable for step-through or very sloped top tubes |
| Zero frame contact | Step-through, low-step, and e-bikes | Fork or seat post attachment point specifications | Fewer models available; verify e-bike load ratings carefully |
Still unsure which mounting system suits your specific bike? The detailed guide on choosing the right front-mounted child bike seat walks through compatibility checks for every major frame type, with specific guidance on what to measure and where to look.
Which Bikes Are Compatible With Front-Mounted Child Seats?
Most standard adult bikes with a diamond frame will accept at least one type of front seat. Your frame type and tube dimensions determine which mounting system works — and by extension, which seats are available to you. Here’s a quick guide by bike category.
- Hybrid and city bikes: The most flexible category. Both top tube and head tube mounts typically work, giving you the widest selection of seats. These bikes are the most popular choice for cycling families precisely because of this versatility.
- Road bikes: Head tube mounts often fit well. If your frame is carbon fibre, always check the manufacturer’s guidance before clamping anything to the steerer or top tube — carbon has specific load limits and clamping tolerances.
- Mountain bikes: Steeper geometry can reduce handlebar clearance. Check the gap carefully before buying. Top tube mounts are the more common choice here, though head tube mounts work on many models too.
- Step-through and low-step bikes: Zero frame contact is your only option. The absence of a conventional top tube rules out the two other mounting systems entirely.
- E-bikes: An increasing number of front seats carry explicit e-bike compatibility ratings in 2026. The critical check is total maximum load — add your weight, your child’s weight, and the seat weight, and compare that combined figure against your e-bike’s stated load capacity. Front-hub motor bikes also require close attention to front-axle weight limits.
- Cargo bikes: Some long-tail cargo bikes have dedicated child seat systems. Standard front bike seats may not suit cargo bike geometry — always check the compatibility list for your specific cargo bike model before buying.
One practical habit to build before you shop: measure your top tube and steerer tube diameters and write the numbers down. It takes five minutes and immediately eliminates incompatible seats from your shortlist.
What Safety Features Should You Look for in a Front Bike Seat?
Safety starts with a certification mark. EN 14344 is the European standard for child bicycle seats, covering structural integrity, harness load capacity, foot-rest design, and material safety. Any seat sold legitimately in the UK or European market must meet this standard. If you’re purchasing via an overseas marketplace, verify that the specific seat — not merely the brand — carries valid EN 14344 certification. This single check eliminates the most significant safety risks.
Beyond certification, these features make a meaningful difference to safety and day-to-day use:
- 5-point harness: Two shoulder straps, a waist belt, and a crotch strap form the safe minimum. This combination keeps your child secure even if they wriggle enthusiastically or fall asleep mid-ride.
- Enclosed foot rests with retention straps: Open foot rests create a real risk of small feet entering the spokes. Enclosed foot rests with ankle or calf straps reduce this risk significantly and are the safer choice at any price point.
- Padded sides and head support: Higher, padded sides support your child during corners and offer some protection in a sideways fall. A head support cushion or insert is particularly important for younger children who may fall asleep on longer rides.
- Clearly stated weight limit on the seat itself: The limit should be printed on the seat body, not just in the manual. Check it is clearly marked before you buy.
- Torque-specified mounting hardware: Quality seats provide torque values for every mounting bolt. Over-tightening can crack alloy or carbon tubes; under-tightening allows the seat to shift under load. Following the specified torque is not optional.
How Do Front Seats Compare to Rear Seats and Bike Trailers?
All three options carry children safely when used correctly. The right choice depends on your child’s age and weight, your riding style, and what kind of experience you want for both of you.
Front seats are the most interactive option by a clear margin. Your child faces forward, shares your sightline, and provides a running commentary on everything — which most toddlers approach with tremendous enthusiasm. Maximum weight limits of 15–22 kg suit children up to around 3–5 years. The one trade-off is that your child sits between your arms, which some riders find takes a short adjustment period on busier roads.
Rear seats accommodate heavier children — most carry loads up to 22 kg — and have less effect on your handling since the weight sits over the rear wheel. Your child can still see plenty from behind you, but the face-to-face interaction is gone. Rear seats are compatible with a wider range of bikes and tend to be the natural progression once a child has outgrown the front seat’s weight limit.
Bike trailers carry the most weight — combined child loads of 40 kg or more on many models — and can take two children simultaneously. They shelter children from rain and wind, allow comfortable napping, and don’t affect your bike’s handling significantly. The trade-offs are cost, storage space, and minimal direct interaction with your child during the ride.
What Should You Expect to Pay for a Front Bike Seat in 2026?
Front bike seat prices in 2026 span a wide range. Understanding what each tier actually delivers helps you spend where it counts and avoid false economies.
Budget (under £60 / €70): Entry-level seats at this price usually meet EN 14344 but offer fewer adjustment options, simpler harness designs, and more basic padding. They’re a reasonable starting point if you’re unsure how much you’ll cycle or are buying for a child who will outgrow the seat quickly. At this price point, scrutinise the harness mechanism and the foot-rest enclosure before committing — these are the areas most likely to feel underpowered.
Mid-range (£60–£130 / €70–€150): This is the sweet spot for most families. You get noticeably better padding, a more intuitive harness adjustment system, clearer installation instructions, and a more robust mounting bracket. Many of the best-regarded front seats on the market in 2026 sit in this bracket, and the improvement in everyday usability over budget options is tangible from the very first ride.
Premium (£130+ / €150+): Premium seats deliver one-hand harness release, broader compatibility across bike types, higher-quality materials, and typically stronger aftersales support including replacement parts. If you plan to use the seat over several years or pass it to a second child, the longevity built into a premium seat frequently justifies the higher outlay. Some premium seats are also designed to accommodate a wider age range, extending usability closer to the 22 kg maximum.
One area where spending more nearly always pays dividends: the harness. A well-engineered harness is quick to adjust, releases cleanly under pressure, and stays secure through a wriggly toddler’s best efforts. Don’t compromise on this quality regardless of which tier you’re shopping in.

How Do You Install a Front Bike Seat Correctly?
Installation is straightforward on most seats, but it’s worth taking your time the first time. A careful first fit prevents most of the problems families encounter later on. Here’s the process that applies to the majority of front-mounted seats.
- Read the full manual before picking up any tools. Every seat has its own torque requirements and fitting sequence. Reading first saves time and prevents avoidable mistakes.
- Verify tube diameter compatibility. Compare the clamp range specified in the manual against your measured top tube or steerer diameter. A mismatch means the seat won’t fit safely, regardless of how hard you tighten it.
- Position the mounting bracket on the correct tube. Slide it to a central, level position. Don’t tighten at this stage — you need to check clearance first.
- Check handlebar clearance. With the seat roughly in position, verify the gap between the front edge of the seat and the back of your handlebars. Your child’s legs need room, and so does your grip.
- Tighten the bracket to the manufacturer’s specified torque. Use a torque wrench where possible. Under-tightening can allow the seat to rotate under load; over-tightening can crack alloy or damage carbon tubes.
- Attach the seat body to the bracket. Follow the manufacturer’s sequence step by step. Confirm the seat clicks or locks firmly into place before adding any weight to it.
- Adjust foot rests and harness for your child. Foot rests should support your child’s feet comfortably without forcing their knees upward. The harness should be snug: two fingers fit under the shoulder straps — not four, not zero.
- Test with no child in the seat first. Ride around the block on your own. Listen for rattles, watch for seat movement, and check that your steering feels natural with the seat in place.
- Re-check all fixings after the first ride. Vibration loosens bolts. Re-check torque after the first outing and again at the start of each new cycling season.
If this is your first time fitting a front seat, most independent bike shops will run a fitting check for free or a small fee. This is particularly worthwhile for head tube mounts, where stem configuration and steerer diameter can add complexity to the process.
When Is It Time to Move to a Different Cycling Setup?
Front seats have a natural lifespan governed by your child’s growth rather than a specific date. Three clear signals tell you it’s time to move on: your child is approaching the maximum weight limit, the foot rests no longer adjust to a comfortable position, or your child has grown tall enough that their knees restrict your handlebar movement during normal riding.
Most families hit this point somewhere between ages three and five. The natural next step is usually a rear-mounted seat, which accommodates heavier children and tends to suit a wider range of bikes. A trailer is the alternative if you want maximum weather protection or need to carry two children simultaneously.
Around this same age, many families also start investing in the child’s first independent bike. An adjustable children’s bike designed to grow with your child is a smart choice here — many models serve children from around age three right through to seven or eight, stretching the value of a single purchase across several years of riding.
When your child is ready to try riding independently but still needs a confidence boost, bikes with training wheels built for five-year-olds bridge the gap comfortably between supported and fully independent cycling. The transition tends to happen gradually and on your child’s own timeline — there’s no need to rush any stage of it.
What Do Cycling Families Actually Think About Front Bike Seats?
Families who use front seats are overwhelmingly positive about them, particularly around the quality of interaction they create. Children in front seats ask more questions, notice more things, and tend to stay happier for longer compared to rear seat or trailer rides. The face-forward, close-contact position genuinely seems to make the ride more engaging — especially for the under-threes who are at the peak front seat age.
Parents consistently highlight the reassurance of having their child in view the entire time. With a rear seat or trailer, there’s always a moment of uncertainty when your child goes quiet. With a front seat, you know immediately if they’ve drifted off to sleep, dropped their snack, or are preparing to express a strong opinion about a passing dog.
The most commonly reported frustrations are both avoidable. The first is compatibility — buying a seat without measuring tube diameters and having to return it. The second is handlebar clearance: riders with taller children sometimes find less hand room than they expected once the child is seated. Both problems disappear entirely if you take the measurements described in this guide before ordering.
Overall, families describe front seats as one of the best cycling investments they’ve made for the toddler years. The early habit of cycling together builds a relationship with bikes that outlasts the seat by many years.
Frequently Asked Questions About Front Bike Seats
At what age can a baby go in a front bike seat?
Most manufacturers recommend starting once your child can hold their head steadily while wearing a cycling helmet — typically between 9 and 12 months old. The developmental milestone matters more than the specific birthday. If you’re unsure whether your child is ready, check with your health visitor before starting.
Are front bike seats safe for toddlers?
Yes, when the seat is EN 14344 certified, correctly fitted to a compatible bike, tightened to the manufacturer’s specified torque, and used with a properly sized cycling helmet on every ride. Always use the full 5-point harness. A correctly installed, certified front seat is a safe seat.
Will a front bike seat fit my bike?
It depends on your frame type and tube diameters. Measure your top tube and steerer tube diameters before shopping and compare them against each seat’s stated compatibility range. Step-through frames need zero frame contact seats. Standard diamond frames have more options, but clamp compatibility still needs checking. When in doubt, take your bike to a local shop before buying.
Can I use a front bike seat on an e-bike?
Some seats are explicitly rated for e-bike use — always check the manufacturer’s guidance. The critical calculation is total maximum load: add your weight, your child’s weight, and the seat’s weight, then compare against your e-bike’s stated load capacity. Front-hub motor bikes also require close attention to front-axle load limits before fitting any front-mounted accessory.
What is the weight limit for a front child bike seat?
Most front seats are rated to between 15 kg and 22 kg. Check the specific limit for your seat and weigh your child at the start of each cycling season. Never exceed the stated maximum — it is a structural safety limit, not a guideline.
How do front seats compare to rear seats for toddlers?
Front seats offer more interaction and closer contact — ideal for younger toddlers from around 9 months to age 3. Rear seats accommodate heavier children (up to 22 kg on most models) and affect handling less. Many families use a front seat for the early years and graduate to a rear seat as their child grows — the two complement each other well over time.
Can my toddler fall asleep in a front bike seat?
Yes — and they often do on longer rides. A head support cushion is essential if this is likely, since an unsupported sleeping head will flop forward uncomfortably. Some seats include a head support insert; others sell it as an accessory. If you plan to do rides of 30 minutes or more, prioritise seats with a well-designed headrest and firm shoulder strap support.
Your Next Steps: Getting Started With a Front Bike Seat in 2026
A front bike seat opens up a whole category of family cycling that wouldn’t otherwise be possible until children are old enough to ride alone. Here’s a clear sequence to get from “thinking about it” to riding together confidently.
- Confirm your child is ready (this week): Can they hold their head steady while wearing a helmet? If not yet, note the date and revisit the question in four weeks.
- Measure your bike (this week): Top tube diameter, steerer tube diameter, frame type. Five minutes, a tape measure, write the numbers down. This step prevents the most common buying mistake.
- Research compatible seats (this week to next): Use your measurements to filter options. For each candidate, check EN 14344 certification, weight limit, harness type, foot-rest design, and compatibility with your specific bike type.
- Buy and install carefully (within two weeks): Follow the nine-step installation process above. Use a torque wrench. Re-check all fixings after the first ride.
- Start with short rides (within three weeks): Begin with 10–15 minutes on a quiet route. Watch how your child responds. Adjust foot rests and harness as needed over the first few outings.
- Plan for the transition (ongoing): Track your child’s weight each season against the seat’s maximum limit. When the front seat is outgrown, start exploring rear seat options or your child’s first independent bike.
The toddler years in a front seat go quickly — and they’re genuinely special. Get the fit right, get the helmet right, and then just go and ride. The rest takes care of itself.
“`